In this lesson we will go through some basic sound editing steps using Audacity for
typical applications for class projects (recording and basic editing). You can download Audacity for Mac or PC for free.
If necessary, be sure to also follow the directions in the FAQ to download & install the Lame encoder that lets you export your sound in mp3 format (mp3 is a common format that compresses sound).
In order to import and export additional sound formats that your iPod, telephone, or digital voice recorder might use (such as WMA, M4A, or FLAC), you might need to can download and install the free FFmpeg library.
1. Capture sound [File/New]
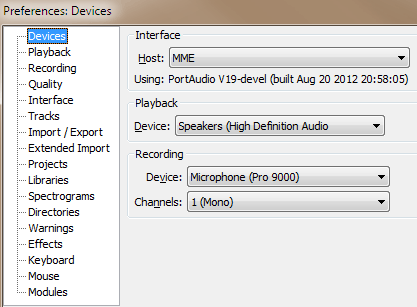
Audacity opens ready to begin recording, but you should first choose some settings to be sure that you are recording in the format that will be best for your project. Selecting the preferences for your sound format is done in the Edit/Preferences menu.
You can select your sound devices for playback & recording (which microphone do you want to use?) and also set stereo or mono recording. Mono is fine for most language class projects.
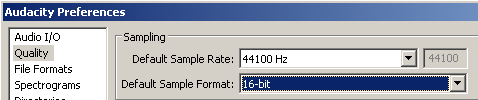
You can set quality for your sample rate (44100 Hz or 22050 Hz - how many sound samples per second?) and your sample format (16-bit or 32-bit - how precise is each sample?).
16 bit shoul be fine for most language class projects. It's also the right size to use for your final output.
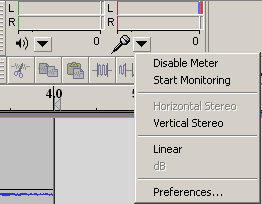
Within Audacity, the VU meter for checking sound levels (loudness) is always visible, but you can Start Monitoring or turn it on to test levels using the microphone drop-down menu (see below). The louder the sound, the farther to the right the meter will go.
The line remains for a time to help show the highest recent
peak.
If clipping occurs (sound too loud for the equipment), the clip indicator at the right of the meter will
become
red.
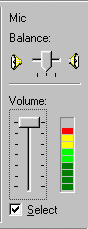
You can also use the Windows Volume Control window (Options / Properties / Recording) to monitor sound
recording levels. For best results the level should be high but should never enter the
red
clipping zone. Adjust the volume accordingly.
In Windows 7, 8 the microphone properties can set the mic boost and level.
However, you can also set volume and monitor levels directly within Audacity.
Avoid background noise.
Use a good microphone. Talk across your mic, don't blow air into the mic.
Use 16-bit samples. 32-bit yields better quality while editing your working copy, though you should reduce the final copy to 16. 32-bit won't work in final versions.
Select sample rate (22050 is ok for voice depending on
desired quality;
44100
yields CD quality for music).
Higher sample rate creates larger file size and slower downloads but better quality.
Adjust volume to maximize the sound but avoid clipping
(if a wave is too loud, the top of the
wave is clipped off).
It's good to leave at least a second of silence at the start and end of the recording to aid in possible
future
noise
reduction and to be sure you don't accidentally cut off the speaker.
too loud
too soft
just right
If you have trouble getting your own sound file for the following
steps, you may download a sample sound and practice editing that : soundsample.mp3. All of the manipulations of digital sound are really mathematical transformations (remember graphing functions in algebra class?), just as pretty much everything else in a computer boils down to math & logic.
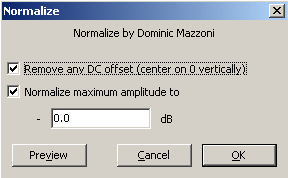
2. Center Wave (aka DC bias adjust, DC offset remover) [Effect/Normalize/Remove DC offset]
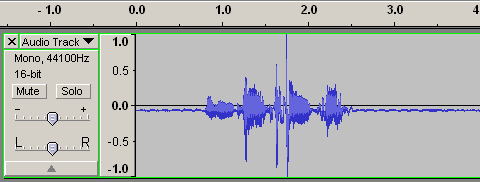
VERY important step after many recordings! Your sound might not be centered (see below for a wave that is not centered).
Centering should always be done FIRST. In Audacity, DC Bias can be found under the Normalize effect. You can also find the DC Offset Remover effect that centers the wave without normalizing. If you have additional effects to apply, you might prefer to center the wave first and Normalize last.
Make sure that the wave is centered before applying any other
transformation. (I know I am repeating, but this is important.)
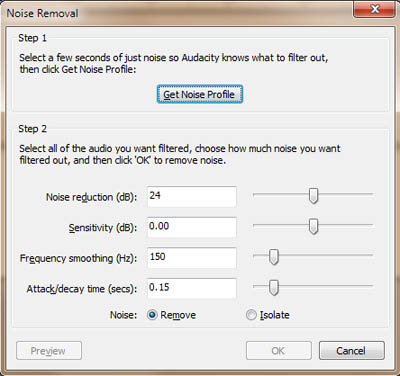
3. Noise removal [Effect/Noise Removal] But only do this if you think the sound really needs it.
In Audacity, the noise removal effect is fairly straightforward.
Select a few seconds of noise, then get the noise profile.
Next, go back to your sound, and select the whole thing. You can preview before actually removing the noise. If you don't like the result, you can try removing more or less of the noise until you are satisfied.
Without going into the details, noise reduction transforms the part of the sound that it considers "noise" into something softer. Too much noise reduction creates unwanted distortion, so it is not a magic bullet. It is better to record clean audio in the in the first place than to try to fix it later.
4. Trim [Edit / Remove Audio or Labels / Trim Audio]
Audacity
When trimming, use the Zoom tool to find the precise segments that you wish to select. Listen to your selection to be sure it is what you want.
Select area of the sound you want to keep then select Edit/Remove Audio or Labels / Trim Audio.
You can also select a part of the sound you don't want and simply delete it to remove or cut something.
5. Listen carefully and clean up anything you don't like. To avoid
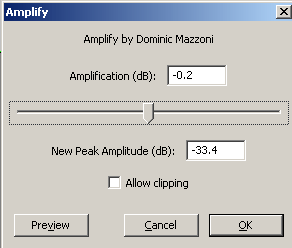
breaking the rhythm of your sound sample, reduce the volume (Effect / Amplify) of problem
noise instead of cutting it out. Using a negative dB (decibels) reduces the volume. Be sure to avoid clipping and pay attention to the new peak amplitude.
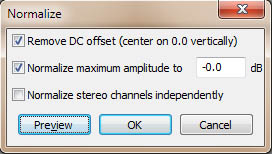
6. Normalize [Effect/Normalize]
Use this to ensure that all of your sound files are at the same level.
Set to -0.0dB to set the sound to the maximum levle with no clipping. You might use a slightly lower levle -0.5dB, but be sure to always use the same level. You can preview the sound. (-3dB is about 75%)
Click OK to make the change.
Whereas Noise Reduction, Noise Gating, and Compression may not be
needed,
Normalization is generally required to make your project sound good. You can do the DC Bias Adjust (Center Wave) in the Normalization window to save a step (only if normalization is the only modification you are making to the sound).
7. Save backup copy
Keep a backup at the best sampling rate possible for future use.
8. Change sampling rate if necessary, but only if you are sure
For use on the Web, it can be necessary to reduce sample rate for
faster
file transfer.
In general, just leave this alone.
9. For use on the Web most sound files should be exported as .mp3. It usually
is not useful to use stereo for most voice-only applications. Stereo takes up twice as much room. You can choose the file format quality for mp3 export settings, for instance, mp3 lets you determine how much to compress your sound. As with images, more compression means smaller file size but poorer quality.
The most important and most common steps in sound editing are : 1. Capture, 2. Center Wave, 3. Trim, 4. Normalize, 5. Export to the final version.
In Audacity, the View / History feature is very nice and will allow you to undo any of the edits that you have made to a sound.
For this course, we are using a free program called Audacity. It works quite well and can do everything you will need: http://audacity.sourceforge.net/ (The current version is 2.0.5, and this requires an additional Lame plug-in to export mp3.)
A very inexpensive solution that also seems to do a good job with
sound is either MIXCRAFT Home
Studio, about $50, from Acoustica http://www.acoustica.com/ AVS Audio Editor has an evaluation period, but also very inexpensive. Goldwave is great in it's price range, about $59.
 You can also use the Windows Volume Control window (Options / Properties / Recording) to monitor sound
recording levels. For best results the level should be high but should never enter the
red
clipping zone. Adjust the volume accordingly.
You can also use the Windows Volume Control window (Options / Properties / Recording) to monitor sound
recording levels. For best results the level should be high but should never enter the
red
clipping zone. Adjust the volume accordingly.