Answer
| Jean LeLoup & Bob Ponterio
SUNY Cortland © 2017 |
Annotating text in a web page with anchors
It is possible to use hypertext links to annotate text in a web page. One could link to an entirely new page for each glossed word, but the effort involved in doing that might be out of proportion to the value of the final product (IOW You would have to make far too many separate web pages). A simpler method involves creating an annotation or glossary/vocabulary page with anchors or targets for each text entry. The links from the original text can then point, not just to the glossary page, but to the specific anchor on individual lines within that page, and so to the correct individual word, in the annotation page. The glosses in this paragraph work this way. And here is a much more extensive example for a Statistics course in Spanish.
In other words, you can link to, not just a page, but to a specific place in a page.
|
In this example each of the glossed words links to a target (anchor)
in the annotation page corresponding to the text for that particular
word. The anchors each have a name, and it is this name that
allows the web browser to identify the location within the page
referenced by the link.
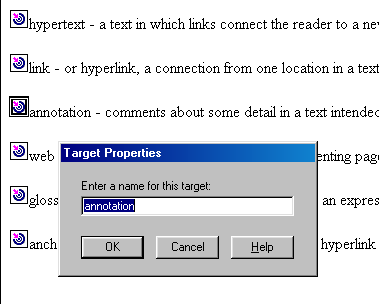
To create the anchors in Dreamweaver or KompoZer, use Insert / Named Anchor. Don't forget to give each anchor a unique name (no spaces or punctuation please). If two anchors have the same name, your computer will be very confused, like two houses having the same address.
When creating a link to a target in your web page editing program, use the target web page name just as you usually do, but add a pound sign "#" followed by the anchor name (no spaces). gloss-annotation.html#annotation or for an absolute link: http://web.cortland.edu/flteach/mm-course/gloss-annotation.html#annotation
|
When the user clicks on a hyperlink to one of these targets in an annotation page of this sort, the browser will bring the line containing the targeted text to the top of the new page. This will work better if enough blank lines are added to the bottom of the annotation page to allow space for the targets at the bottom of the listing to rise or scroll to the top of the browser window.
Creating links to targeted cues in an annotation page of this sort is fairly simple and can provide a quick and dirty text annotation method. The disadvantage of using this system is that the original text disappears from view when the annotation appears. This can be distracting to the reader, and in some cases might lose the reader's place in the original document. - Be sure to use BACK to return to the original text.
One solution to this problem is to force the annotation or glossary page to open in a new tab or window, leaving the text in place in its original window. To do this, edit the HTML code of the link properties to add a new target window specification. For example, for the link:
<a href="gloss-annotation.html#annotation">annotate</a>
You could add in the code:
<a href="gloss-annotation.html#annotation" target="_blank">annotate</a>
|
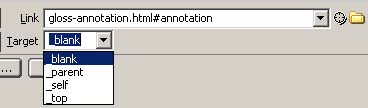
In Dreamweaver, you could simply place the cursor on the link and then select "_blank" from the Target property for the link.
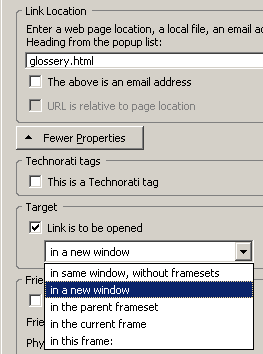
In Kompozer, the target "in a new window" is set in the link properties under More Properties.
|
Now you can annotate a word without losing you place in the original document. However, you now have to keep track of two open windows - That also could be confusing.
A different solution to text glossing involves opening a new pop-up mini-browser window displaying each annotation rather than replacing the document by the annotation in the original browser window. Although this function is not a normal part of HTML, a JavaScript utility can provide this function. We will look at how to place the SCRIPT in a separate file so that it is easy for any of your pages to use this same function.
1. This technique involves two steps. First access a JavaScript function from a separate file (We saw this before when using the modo.js utility). Next set up a special link for each gloss using this new function.
To incorporate a JavaScript function into a web page, first place the script in a separate file. This is a JS file whose name will be something like feedback.js. The JS file is a text file that can be edited with Windows' Notepad program or any text editor, but it must be saved as a simple text file with the required extension .JS. The JS file should NOT include the <script> and </script> tags. To be able to use the JavaScript function in your web page, you must use the <script> tag to tell your page where to find the script.
<script src="feedback.js">
</script>
The src="feedback.js" part of the tag tells the page where to find the source of the JavaScript function. Don't forget the quotation marks. This technique allows you to use a single copy of the script from the same file in a number of different web pages. If you need to make a change, it can then be made in only a single place instead of changing all of your pages. This is the technique used in this web page. Here is the text in the feedback.js file.
| function feedback(message) {
var browser = navigator.appName; if ((browser.indexOf ("Netscape") >= 0) || (browser.indexOf ("Explorer") >= 0)) { msgWindow.document.write("</BODY>"); } // end of JavaScript Function feedback |
And here is a link to the feedback.js file for downloading. You can just right click and save the file where you want it, probably in the same folder with the web site where it will be used.
Next set up your individual glosses using the feedback() function.
Activating the popup window in your text
Once your web page has the JavaScript function, your next step is to activate it by clicking on something.
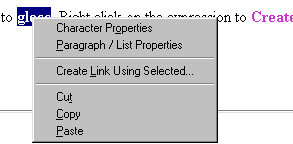
Select a word or expression or image to gloss. Create a Link using the selected text or image.
javascript: feedback('gloss = annotate')
Make sure that it looks EXACTLY like this. Everything between the two single quotes will appear in the popup window. Naturally, you will change the text between the quotation marks to suit each individual annotation. If you need to use a single quote (i.e. an apostrophe) in your popup window, it must be immediately preceded by an "escape" character " \" .
javascript: feedback('All the president\'s men')
JavaScript link for Dreamweaver
JavaScript link for Kompozer
Once the gloss is in place, test it to be sure it is working. There is also more than one way to encode the gloss in HTML. For example:<a href="javascript:void(null)" onclick="feedback('test = test');">gloss</a>
You can also use links from images or buttons, mouseover, any event that can be used as a trigger.
<a href="javascript:void(null)" onmouseover="feedback('test = test');">gloss</a>
Here the gloss uses mouseover so you can just hover over the word. However, if the user's browser is blocking pop-ups, this won't work.
2. Tooltips can also be used for glossing a text without creating specialized pop-up windows. When you place your mouse over the link below, a tooltip will open and display the gloss. The tooltip text is stored in the title property of an html tag.
<a href="javascript:void(null)" title="information about an expression">gloss</a>
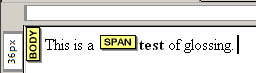
Tooltips are not limited to links like some of the other techniques we have seen. A title property can be added to any number of html tags such as format markup that span text or images. In the example below, we have a tooltip created by adding a title property to the image, to the bold <strong></strong> and green <font color='green'></font> markup, and by using a <span></span> tag.
In the following line, the words "kora", "n'goni" and "rendez-vous" are glossed using a tool-tip.
La kora et le n’goni sont aussi au rendez-vous.
La <strong title='12 string instrument (cora)'>kora</strong> et le <font color="green" title='3-4 string instrument'>n’goni</font> sont aussi au <span title='They are at the get-together.'>rendez-vous</span>.
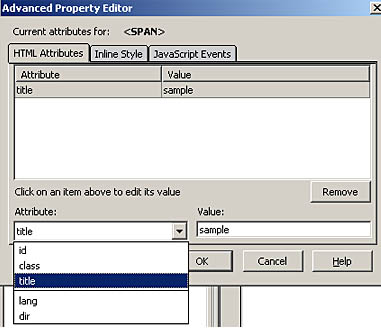
You can edit title properties in the HTML Tags view in Kompozer.
Double-clicking on the SPAN tag brings up the Advanced Properties Editor.
Here we can add the title attribute by editing its value. The value is the text that will appear ("sample").
This is a test of glossing.
Caveat! Using format tags to gloss text presents an inherent danger. If at some point you change the format, you might accidentally delete all of your glosses! In this case, the SPAN tag could be safer.
Don't forget that the link that opens your popup window can be the word that you are glossing, but it could also be any image. You just have to use the HTML code that inserts the object you want.
<a href="javascript: alert('gloss = annotate')"><img src="gloss-5.jpg" width="310" height="57" border="0"></a>
A mouseover event or indeed practically any event could be used.
Note that although we used the built-in Alert pop-up as an example just to let you know it exists, it is very ugly, not user friendly, and should generally be avoided.
There are also many free or inexpensive programs for making more sophisticated popup windows using Dynamic HTML (DHTML). These can create Layers or DIVs (Boxes) that look like windows which remain inside of your main browser window. These can be hidden, moved, displayed, resized. Their contents can be altered using JavaScript.
Here is an example of using DHTML with buttons.
The first US president was:
Washington. Jefferson. Lincoln. Roosevelt. Donald Trump. DHTML is beyond the scope of this course, so this little taste is purely optional. DHTML is called "dynamic" because it can dynamically change the contents of a web page while you are looking at it. If you wish to explore these kinds of popup windows, google search for "dhtml popup".
Note that the contents of some of the table cells above change when certain events (onmouseover, onmouseout) occur. Just to whet your appetite, we can change the contents of many objects (e.g. <Div></Div> or <Span></Span> defined areas of a page, or a paragraph <p></p> or Table Cells) in a way that is similar to the little JavaScript commands that we have used previously to copy text into a Text Box. To do this, we need to give the DIV, SPAN or table cell or paragraph a unique ID. For instance, the code used in the example above simply inserts the name "ansE" as the ID of the lower right table cell.
<td id="ansE">Donald Trump.</td>
We could do the same thing with any area of the screen located between <DIV> </DIV> tags and use any object to trigger the change. The code to set this up might look something like this:
<Div id="answerE">
This text will change if I modify the properties of the page element with the ID = "answerE".
</Div>Actually making the change involves some Javascript that looks just a bit more complex than what we did when changing the Text Box contents:
onmouseover="document.getElementById('answerE').innerHTML='Don\'t you dare!'"
We used onmouseout in the same way to change it back.
Adding in red and green color:
onmouseover="document.getElementById('answerE').innerHTML='<font color=\'#FF0000\'>This is Bob !</font>'" onmouseout="document.getElementById('answerE').innerHTML='<font color=\'#00FF00\'>Did that work?</font>'"
Let's put that in an image tag (We could put these in many other objects as well):
<img src="bob1.jpg" onmouseover="document.getElementById('answerE').innerHTML='<font color=\'#FF0000\'>This is Bob !</font>'" onmouseout="document.getElementById('answerE').innerHTML='<font color=\'#00FF00\'>Did that work?</font>'" width="200" height="290" />
Note that the use of single and double quotation marks needs to be precise and that any single quote or apostrophe used in the text itself must be preceded by an escape character (\).
This text will change if I modify the properties of "answerE".The preceding sentence will change when you mouseover the photo.And we could also put the Javascript code into a function in our page head (changeContent) to simplify our web page if we are planning to change the contents of many named objects on the page.
<Script>
function changeContent(id,shtml) {
if (document.getElementById || document.all) {
var el = document.getElementById? document.getElementById(id): document.all[id];
if (el && typeof el.innerHTML != "undefined") el.innerHTML = shtml;
}
}
</Script>
This makes our source easier to read and to proof. As we have said before, you don't have to understand it to use it. Here it is again, using the function and different colors with a different image.
<img src="bob1.jpg"
onmouseover="changeContent('answerE','<font color=\'#AAAA00\'>This is Bob !</font>')"
onmouseout="changeContent('answerE','<font color=\'#FF00FF\'>Did that work?</font>')"
width="100" height="145" />I'll repeat that this is only a taste for those who might want to explore this aspect of web page design. A good place to start is to take a couple of simple tricks like the ones on this page and play around with them to see what kinds of different things you can make them do. To learn more, look for tutorials on DHTML, CSS style, and JavaScript.
You can set up your own DIV to display feedback without using something that you have bought or downloaded. Here is a sample French fill-in the blank activity that uses these techniques.
JavaScript tutorial for the total non-programmer from WebTeacher: http://webteacher.com/javascript/
Language Interactive: A Trailguide to Creating Dynamic Web Pages by Bob Godwin-Jones, Virginia Commonwealth University: http://germanstories.vcu.edu/cgi/interact.html