We learned in Getting acquainted with the tools that CUSeeMe is an application that enables videoconferencing. By using CUSeeMe, you can send and receive both audio and video, or one and not the other. You can do this between you and one other person or between you and a whole conference room full of people--or a whole classroom of TL speakers!
To get started, you need to get the CUSeeMe software, which is available at Cornell (freeware):
or White Pine Software (not freeware, but you can download a demo copy for limited use):
Both platforms are supported.
You will also need a SLIP or a PPP connection, and at least a 14.4 modem (the faster, the better). This will set you up to send audio and receive both audio and video. To transmit video, so the other participants can see you, you will need some type of video capture card (for the pc) and a video device attached to your computer (such as a camcorder or a QuickCam or Snappy, for example).
I won't go into all the details here of configuring your setup. Some adjustments are platform-specific: i.e., PC or Mac. Two good places to go for this information are:
Bill Woodland's site for CUSeeMe at Cornell (very current and complete):
and Michael Sattler's site for CUSeeMe (you can even visit Eva and B�rre Ludvigsen's home in Norway in real time from this site!):
These two gentlemen have wonderful web sites that will explain all you ever wanted to know about CUSeeMe and then some. Their sites also have links to other useful pages with more CUSeeMe information and resources, including directions for joining the CUSeeMe electronic discussion list. (You remember what those are, right?)
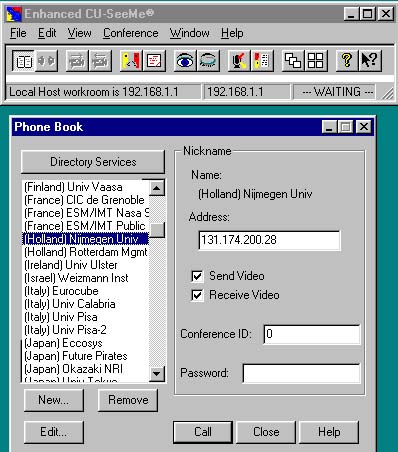
Launch the CUSeeMe application. A toolbar will appear, loaded with icons that are self-explanatory. If you move your cursor to each one, a definition appears. More information can be found in the help files. To connect for a one-to-one conference, you enter the IP address of the person with whom you are conferencing. To connect for a one-to-many or many-to-many conference, you will need the IP address of a reflector that is either public and/or has agreed to host the conference. Lists of public reflector sites and their IP numbers come with the CUSeeMe software and can be found in the "phone book." Below is an image of the toolbar with the phone book open to IP addresses for public reflectors.

Once you have the IP number you wish to connect to, you enter it and connect. Your screen will look like the one below. Both Macintosh and PC software yield windows that are fairly similar.
You can adjust your audio and video transmission and reception preferences, depending on whether you want to see and be seen or hear and be heard or any combination thereof. Again, detailed instructions for making these adjustments can be found in the help files of the software or at the Woodland or Sattler sites mentioned above.
1. Go to one of the sites above and download the CUSeeMe software.
2. Install it on your computer and configure it according to your system, your connection, and your hardware.
3. Go to a public site 1 and try out CUSeeMe for awhile. Remember, as usual, a netiquette exists for use of CUSeeMe�such as not hanging out indefinitely on public reflectors, etc. You can get a good idea of the "rules of the game" by accessing the FAQs associated with the above CUSeeMe sites.
4. Write a brief summary of your experience with CUSeeMe to hand in to your FL methods instructor. Be prepared to discuss what you have discovered about CUSeeMe in class.