Jean LeLoup & Bob Ponterio
SUNY Cortland
© 2017 |
Image Maps - links to part of an image
Hypertext implies the ability to link from one place to another. We have seen that we can link from text or from an image, but we can also link from one or more specific places in an image using an image map. This is quite easy in Dreamweaver. Don't try this with today's Kompozer (hopefully this will be in a future version).
Creating an image map in Dreamweaver
|
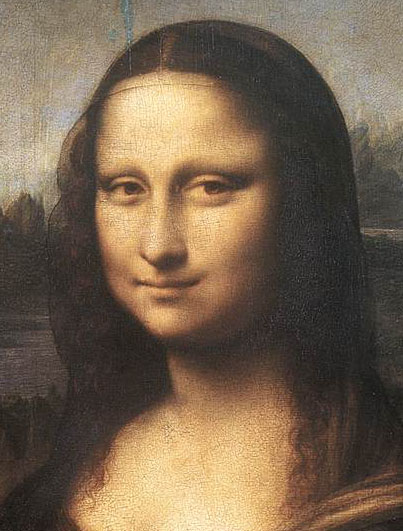
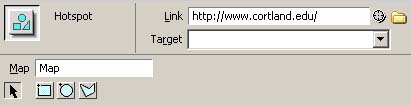
To create our Mona Lisa Eyes image map, we insert the image in Dreamweaver as we would any plain image. Next, we select the image and use the Map properties to give the image map a name, monaMap in our example below.
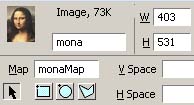
We can then draw squares, circles or polygons with the image map drawing tools to create a number of hotspots.
|
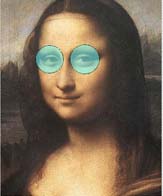
The image now has hotspots that can be used as links, just like the links we have been using from text or full images.
By clicking on the highlighted hotspot with the arrow  , we open a dialog box for a link. In this example, we will use a line of JavaScript code from another lesson to copy the text we want from the image map into a textbox when the user clicks on her eyes. , we open a dialog box for a link. In this example, we will use a line of JavaScript code from another lesson to copy the text we want from the image map into a textbox when the user clicks on her eyes.
href="Javascript:void(0)" onclick="monatext.value='eyes';"
We could simply make a normal link to another page from any hotspot. We could also use some of the other JavaScript code from previous lessons to put words into a popup window or to make something else happen. In addition, we could use mouseover or something else instead of onclick.
The hotspot also has a "title" property that can be used to label parts of an image. Mona Lisa's eyes are labeled "right" and "left". When you place your cursor over an eye, the word "right" or "left" will pop up. In order to make a tooltip popup for her eyes, we added title="Left" to the area shape in the source code, as you can see below. |
 |
<area shape="circle" coords="213,186,37" href="javascript: feedback('Mona Lisa Eyes')" alt="Left" title="Left" >
In our second image above, we also used a rollover image to change her smile. We won't cover rollover's here (it requires several JavaScript functions) but these are easy to find online and copy/paste if you are interested. We just prepare two images and use Javascript to change the image source when some trigger event occurs (onmouseover, onclick). |
The image map code can be edited in the Code view to do all of the same things that are possible for other links. The map code doesn't need to be located near the actual image in your HTML code, so you might have to hunt for it. Note also that it is the image map name (monaMap in this case) that connects the image map location coordinates to the correct image. Here is the HTML code for our little Mona Lisa image map:
<map name="monaMap">
<area shape="circle" coords="124,188,35" href="javascript: alert('Mona Lisa Eyes')" alt="Right">
<area shape="circle" coords="213,186,37" href="javascript: alert('Mona Lisa Eyes')" alt="Left">
</map>
And here is the code for the actual image:
img src="imagemap-mona_lisa.jpg" name="mona" width="403" height="531" border="0" usemap="#monaMap" id="mona">
In Dreamweaver, you don't need to know the code to make this work because there is a built-in imagemap tool that creates all this for you automatically. Kompozer doesn't have a built-in facility for creating image maps without writing the code by hand. It is possible to use other external software for setting up a map, but using built-in utilities is much easier. One solution is to create basic page with only your map in Dreamweaver. Then continue editing the page in Kompozer. This can sometimes cause formatting problems because Kompozer isn't as sophisticated as Dreamweaver in some of the code it produces. Caveat Emptor!
Developingwebs.net: Creating an Image map
Image Maps in Kompozer
Dreamweaver Image Maps
Building an Image Map Rollover
Video tutorial for image map
Online image map tool: http://www.image-maps.com/
Easy image map generator: http://imagemap-generator.dariodomi.de/
Online image map editor: http://www.maschek.hu/imagemap/imgmap
Creating an Image Map - using image-maps.com (Video)
Return
to Syllabus