If you prepare a video to use in a lesson with your students, whether the video is created with a digital camera, a digital video camera, or some other source, it will be easiest for you to create materials consistently if you are used to using a single format for your video. It is also a good idea to use compression and consider the size (resolution) of your video. Your original video will have a certain dimension (width & height) and will be in some video format (mov, avi, flv, mp4, etc.). If you do not know the size (resolution) of your video, right click on it to see the details of its properties.
Two common formats for digital video match the standard sizes for television video.

320x240, 512x384, 640x480 (in pixels) are all 4:3 aspect ratio; in other words, the ratio of width to height is always 4 to 3. If you change the video size (resolution), you should be careful to keep to the same aspect ratio. This is like the old format TVs. Our example above is 320x240.

A second popular aspect ratio is 16:9. Examples are 768 x 432, 512 x 288, 640 x 360. This is like newer widescreen LCD TVs. Our example is 640x360. A higher quality and larger 16:9 size is 1280x720; this is also the preferred size used for high quality (HD) on Youtube.
A 16:9 ratio is wider than 4:3and can be useful for filming a scene with several people, for instance a student play. A 4:3 ratio is more square and can be effective for filming a single person talking. We are likely to see less and less 4:3 video as time goes on.
MPEG4 (mp4) has become a more popular video format because it has fewer compatibility issues than FLV format. For instance, it works well on an iPad.
If you prefer to avoid working with the configuration of the video yourself, you might prefer to use a service such as Youtube to upload and put your video online. But even doing this, your quality will be better if you know a bit about what you are doing. Video is considerably more complex than images or audio alone and can be confusing to the newcomer because there are so many properties that can be configured.
Whatever video format (or formats) you have, you can convert to MP4 format using easily available free software such as Any Video Converter or Freemake Video Converter. Any Video Converter is also available for the Mac.
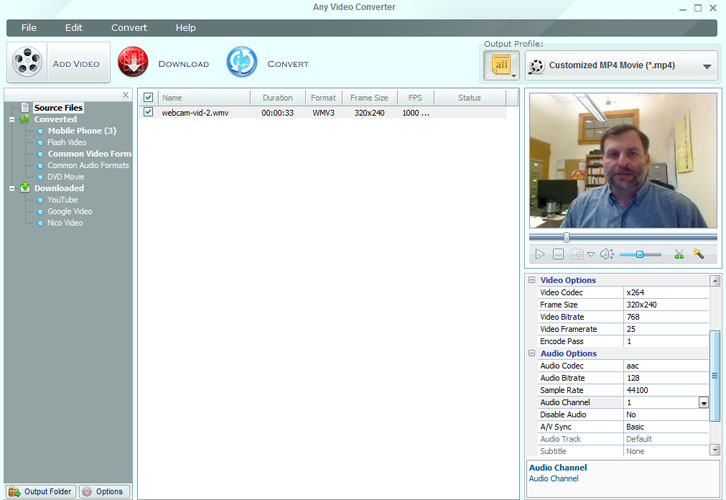
Here we see that we have added the video webcam-vid-2.wmv to the work area of Any Video Converter (AVC), and we are going to convert it to mp4 movie format using a Video Codec: x264 and an Audio Codec: aac. The original Frame Size of the video is 320x240. This is the size I want, so we won't change it, though there are many Frame Size options available. If you don't want to change the video size, the easiest option is to select "Original" Frame Size, but any size you pick will make the video bigger or smaller.
Video Bitrate controls how much data per second is in your file. This will affect image quality. Too high and your video might not be able to download fast enough to play. Too low and the quality of the video will suffer. With a smaller resolution video, you can get away with a lower bitrate (IOW a smaller file size). On today's Internet, a bitrate should probably be no higher than 768, for a high quality fairly large video, and lower (512, 384, 256, 192) might be safer if it doesn't hurt your quality. In our video sample, because the size is fairly small, we were able to use a bitrate of only 192 with no noticeable loss of quality.
Video Framerate (how many images per second) should be the same as your original if possible. This will tend to be 25, 29, or 30, depending on your source. I use 2 pass encoding (slower bit higher quality).
For audio, the aac Codec is highly compatible. Audio Bitrate 128 and Sample Rate 44100 is very high quality, fine for stereo music. If your original audio is not stereo, you can save space using mono (Audio Channel 1) with a lower bitrate. You can also use a lower sample rate if your audio is voice only. 64 and 3200 should be fine for mono voice like the video we are using in our example.
Additional options are available and Any Video Converter can do far more than we are covering here. For example, during the conversion process, it can normalize the audio.
There are a number of ways to embed a video object in a web page. Certain player objects work with particular video formats. In many cases, the actual player used depends on whether certain software such as Windows Media Player or Apple Quicktime Player is installed on the user's computer. If the user doesn't have the software, they might need to download and install it, if they can.
A different approach is to build your own copy of the video player into the web page. The JW Player (note that version 5 is no longer available on the site) is a free player that you can use on your web site for non-commercial uses. It can be easily installed in a web page and can handle mp4 and flv among other formats. JW Player can also use HTML5 for compatibility with iPads.
After downloading JW Player as a Zip file, extract it to a folder containing a number of files. Only two of these files are necessary to allow your web page to use the JW Player. These are jwplayer.js & player.swf. Your web page doesn't care where these files are located, as long as you accurately point to their location on your web server. The easiest way to keep the location clear and also to update the player when there is a new version is to place only a single copy of the player on your web site and to put these two files in a jwplayer folder located in the root directory of your web site. Then any web page with video will need to point to this location to find the player.
JW Player 5
[ Files for JW Player 5: jwplayer.js / player.swf ]
To put a player in a web page, you first need to put the following script into the header area of your web page source code. Assuming that the jwplayer folder is in the same folder as your web page:
<script type="text/javascript" src="jwplayer/jwplayer.js"></script>
Depending on exactly where you put the jwplayer folder in relation to your web page, the actual location might be different. For example, to go up a level in your folder structure, the code would be:
<script type="text/javascript" src="../jwplayer/jwplayer.js"></script>
This is similar to creating a link to a web page in a different folder, relative to your web page. Once the Script tag has been placed in the page header, the page will be able to use the player object. Here is the same video in mp4 format using the JW Player:

loading player... |
The code for inserting the video player is pasted into the page's source code. The parts that might need to be edited are in bold.
<div id="flashbanner1"><img src="webcam-vid-2_x264_192.png" width="320" height="240"><br>
loading player...</div>
<script type="text/javascript">
jwplayer("flashbanner1").setup({
flashplayer: "jwplayer/player.swf",
file: "webcam-vid-2_x264_192.mp4",
height: 276,
width: 320,
image: 'webcam-vid-2_x264_192.png',
stretching:'exactfit',
icons:'false',
controlbar: "bottom",
allowfullscreen: "true",
allowscriptaccess: "always"
});
</script>
We'll walk through the setup. The first part of the player code is a DIV tag.
<div id="flashbanner1"><img src="webcam-vid-2_x264_192.png" width="320" height="240"><br>
loading player...</div>
The DIV is just a section of code. Each DIV on a page needs a different ID, so you might call the first one flashbanner1, the next flashbanner2, etc. It doesn't matter what this name is, so vid1, vid2 vid3 would be fine. The img src is a pointer to an image. This image and the words "loading player..." will be displayed if the player can't be shown for some reason. It's also a good place holder to help you see where the video is while you are editing your web page. The width & height are the size of your image.
<script type="text/javascript">
jwplayer("flashbanner1").setup({
flashplayer: "jwplayer/player.swf",
file: "webcam-vid-2_x264_192.mp4",
height: 276,
width: 320,
image: 'webcam-vid-2_x264_192.png',
stretching:'exactfit',
icons:'false',
controlbar: "bottom",
allowfullscreen: "true",
allowscriptaccess: "always"
});
</script>
In the actual script that follows the DIV, we are using the same ID, "flashbanner1". The flashplayer property "jwplayer/player.swf" is the same location that we used earlier in the script tag in the header. The file property tells the player the name and location of the video file. In this case we just needed the file name because the video is in the same folder as the web page. The image property is using the same image as the one in the DIV, but this is an image that is displayed in the video player before the video starts playing.
Our video is 320x240. We have given it a width of 320, but a height of 276. The control bar at the bottom of the video player is 36 pixels high, so we use a height that is the video height plus 36 pixels. 240+36=276.
It is also possible to stretch the video if we wish. To get a video that is twice as wide and twice as high (640x480), we use a width and height of 640 and 516 (480+36=516). Stretching a video (like increasing an image size) will result in lower image quality, but it also gives us a larger video with a smaller file:
loading player... |
JW Player 6
Here is a page for testing JW Player 6 (Mixing version 5 & 6 on the same page is problematic.)
<div id="myElement">Loading the player...</div>
  <script type="text/javascript">
    jwplayer("myElement").setup({
      file: "webcam-vid-2_x264_192.mp4",
      image: "webcam-vid-2_x264_192.png",
    });
  </script>
Loading the player...
Video can be a very effective pedagogical tool. By always using the same sources and settings for your video, you can avoid the more complicated choices that can come up if you are frequently using videos of different sizes & qualities from different sources. If you can use a single video shot with your camera, you will also avoid the need for editing. Keeping it simple can make the entire process easier to manage.
Try your own hand at this:
Download a video about the English past tense and try it out: (use Firefox & Video Download Helper.)
http://www.youtube.com/watch?v=WuxtI_AIDg8
http://www.youtube.com/watch?v=ZYfn7C9gKto
Or just make your own video with your cell phone or camera.